How To Shave with a Straight Razor
Choosing a traditional straight razor over modern bladed tools can be a fairly intimidating transition for a lot of men. With a good amount of patience and adapting to the right techniques however, you can soon find yourself shaving with a refined confidence and to greater end results.
Our disposable blade straight razors incorporate the same design and required shaving methods as cut throat razors, however without a fixed blade to maintain, they act as the perfect tool for introducing yourself to the art of traditional shaving.
A single blade razor will give a very close shave because it works directly against the skin - safety razors, especially modern, multi-blade ones, are guarded so the shave will not be as close. The handle and blade design aesthetic of a straight razor is also something that modern blade razors can't match, which is often why many men make the change. Whether that's to a traditional single blade cut-throat razor, or a disposable blade straight razor such as the Murdock Elliot.
However, with that great sharpness comes great responsibility. You want your shave to mean you cut a dash, not your skin. So we asked
Murdock Covent Garden Head Barber
Miles to teach us more about how to shave with a straight razor.
"Use Pre Shave Oil to soften the whiskers and prepare the skin for the razor's edge. Helping the razor to glide, not drag, across the face."

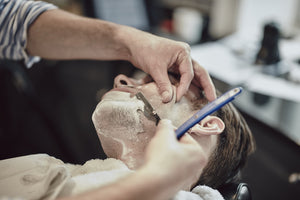
Step 1: Prepare Your Skin
As we like to say at Murdock, 'Success depends on preparation': So the first stage is always to prepare your skin properly. You need to make sure to warm the skin and lubricate it before shaving.
Use a hot towel or shave straight after showering, either will assist in opening your pores. Use
Pre Shave Oil to soften the whiskers and prepare the skin for the razor's edge. Helping the razor to glide, not drag, across the face.
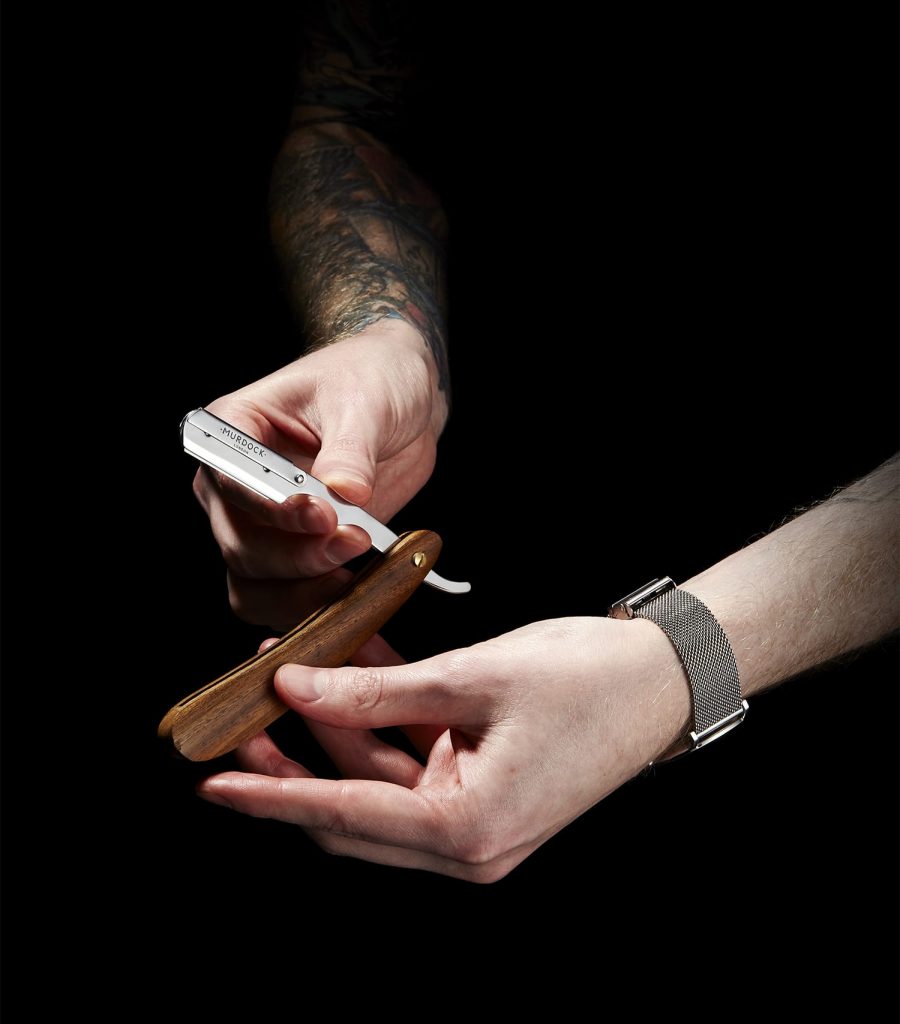
 Step 2: How to Hold Your Razor
Holding a traditional razor for the first time can be an intimidating experience if you’re otherwise used to a modern, plastic handled razor with a protection cover over the blades. Once again, the benefit of a straight razor compared to a cut throat is that you don’t have a permanently exposed sharp edge to be wary of catching your new shirt or worse yet - your face.
Before you look to load your blade, get to grips with holding your straight razor with your ring finger hooked over the tang whilst resting your middle and index fingers on the back of the blade. Your thumb should sit on the side of the blade next to the center.

Step 3: Load Your Blade
Once you’re comfortable holding your razor, lift the metal catch at the head and separate the two metal sections of the razor.
To snap your double edge razor blade in half, ensure that the bladed edges are facing towards and away from you. Hold it from underneath with both thumbs and middle fingers in the middle. DO NOT HOLD IT BY THE EDGE OF THE BLADES. Then fold the sides upwards so the two blade edges bend towards each other until snapping.
Fit your now-single blade over the two raised bumps on the lower metal section. Then place the higher metal section on top and squeeze together. Once you close the catch over the two metal sections, your straight razor will be ready to use. Prepare to enjoy your closest and most satisfying shave yet…
 Step 4: Shaving Technique
Shave with the Grain
Step 4: Shaving Technique
Shave with the Grain
Always check the direction of hair growth: You should always shave with the grain when using a single blade razor. This will help prevent cuts, irritation and ingrowing hairs. Shave from the sideburn down and follow your hairline if it's straight. A key tip is to always pay extra attention to the neck as growth can vary here. If your neck hair grows sideways, you can work from underneath. When shaving the Adam's apple, the trick is the pull the skin tight to each side. If you meet any tougher patches of hair, then cut across parallel.
Stretch Your skin
Holding the razor in one hand, always make sure to stretch your skin upwards with your free hand to keep it taut whilst continuing to shave downwards. You want to be stretching your skin with your fingers behind the blade to expose your facial hair as best possible. Work your shave to create space so that your fingers aren't slipping and straying away from the targeted hair. For the awkward mid-section of your moustache, squeeze the skin below your nostrils together to fully expose the area.

Maintain a Steady Angle
Aim to keep your blade at a 30-degree angle to allow it to glide smoothly across your face and cut the hair effectively. The more perpendicular the angle the more likely you are to cut yourself with it. Shave from your sideburns down, then over to your cheeks, leaving a strip from the moustache down. All that is then left is to chip away vertically down the middle of your face.
How Many Passes?
Begin your first pass with very little pressure, allowing the weight of your razor to influence lighter strokes. For a completely smooth finish you can make multiple passes over one area, just be sure to re-apply your shave cream lather beforehand to sufficiently prepare the skin for the blade.
Step 6: Change Your Blades
Remember feeling obliged to make that worn Mach 3 head last just one more quick and painful shave? After each use every type of blade naturally dulls - increasing the chance of razor burn and irritation. Being able to refresh your single blade after each shave at the value of a few pence compared to a moulded modern razor head at over £1 eliminates that sense of economical strain and also results in a more hygienic shave.
 Step 7: How to Store a Razor
After a good shake, dab your razor with a dry towel after use and keep it stored in a dry environment to avoid corrosion and damage to your razor’s head and edge caused by lingering water.
For an added professional touch, you can also consider storing your razor in Barbicide, a powerful disinfecting solution which is used by all of the Murdock barbers. It also contains an anti-rust formula that will go a long way in preserving the condition of your razor.
Step 8: Post-Shave Care
After shaving, cool your skin down with a cold flannel for a few moments and rinse away any soap residue. Apply a liberal amount of
Post Shave Balm to soothe your face. If by chance you have any nicks, dab them with a
Murdock Alum Bar to help them seal.
No more fear chaps. It's time to make that jump and start shaving a more traditional way with confidence.